Sunday, February 8, 2009

Creating ICEfaces Template

Basically, we need template to enable you to change once and apply to all the pages. Template is very useful for easier and better maintenance of your web site. For example, you don't want to change your web site name or description very often. However, when you want to change, you don't want to change in every single pages of your more than 100 pages web site. Moreover, the consistency of your web site look-and-feel is also the good impression for your visitors. Using template will help you control of the consistency of your web site styles, menus and so on.

So, this post will help you create a simple template using ICEfaces tags. Follow the steps below to create your own template easily and quickly as 123, 1) Creating folder structure, 2) Preparing styles and 3) Creating and applying template files

1) Creating folder structure
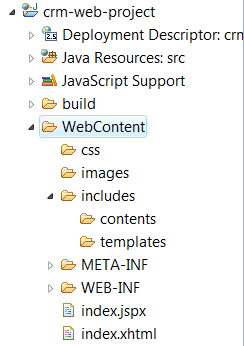
Create the folders similar to the structure shown in firgure in WebContent folder of your project, crm-web-project. Each folder description is explained as below:

css for all the styles
images for all the images, you may need other sub folders like icons and logo to organize your icons and company related images
includes for all the jspx files used in every pages. The pages will be kept right under WebContent folder
    contents for all the page contents which can be forms, table, tree or others
    templates for all the templates file such as header, footer, main template, and etc.


2) Preparing styles
Before creating templates, we'll copy the ICEfaces styles and icons from component-suite project to our project first. You may use your own styles if you had one already.
  1. Go to [ICEface installed]\samples\component-showcase\common-web\css to [crm-web-project]\WebContent\WEB-INF\css
  2. Copy three css files: showcase_layout.css, showcase_overrrides.css and showcase_styles.css and also the images folder
  3. Paste all the files to your project css folder
3) Creating and applying template files
Now, we've got read-made styles and icons. Then, we gotta create our own templates which are header, footer, default-template jspx files.

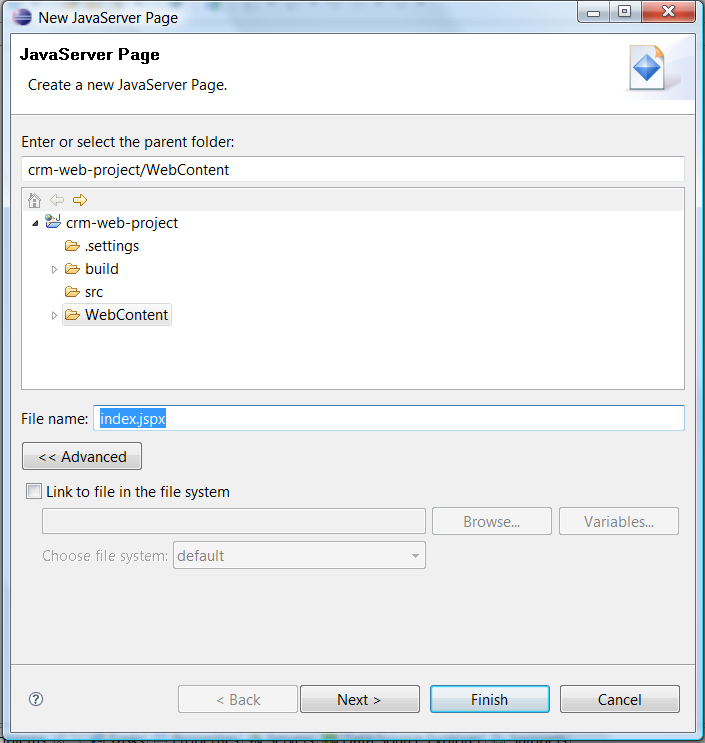
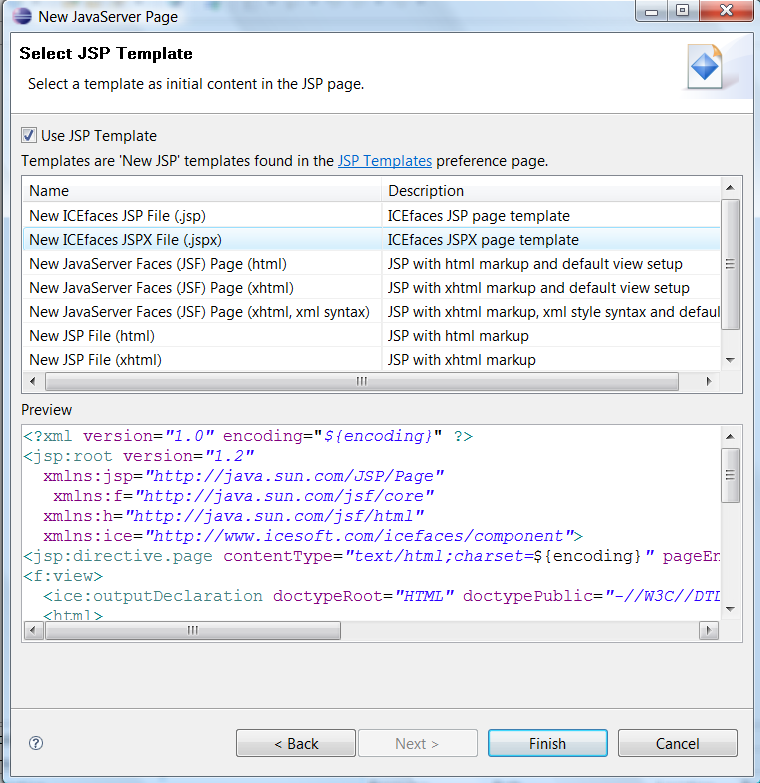
1. Create default-template.jspx file under templates folder using New JSP File Wizard, explained in previous post "Creating New JSPX File".
2. Add styles called, the following code, before </head> tag.
 
  <link rel='stylesheet' type='text/css' href='../css/showcase_style.css' />
  <link rel='stylesheet' type='text/css' href='../css/showcase_overrides.css' />
  <link rel='stylesheet' type='text/css' href='../css/showcase_layout.css' />

3. Replace the <title> </title> tags with the following code which will use the specific title defined by applied pages

<title>#{pageTitle}</title>

4. Add header and footer to template, the following code, overwrite the existing default contents which is after <body> and before </body> tags.

  <!-- header start -->
       <ui:insert name="header">
            <ui:include src="/includes/templates/header.jspx" />
        </ui:insert>
   <!-- header end -->
   <!-- body start -->
     <div class="body_container">
            <div class="body_content">
               <div class="contentContainer">
                    <!--
                       Main Component content;
                       controls which content to display for the respective navigation
                    -->
                       <ui:insert name="page-content"/>
                </div>
            </div>
        </div>
    <!-- body end -->
    <!-- footer start -->
         <ui:insert name="footer">
            <ui:include src="/includes/templates/footer.jspx"/>
          </ui:insert>


5. Create header.jspx file with the following code which creates the table with page menus: Home, Register, Login

<div xmlns="http://www.w3.org/1999/xhtml"
     xmlns:ice="http://www.icesoft.com/icefaces/component">
   <div class="header_container">
        <div class="header_content">
               <table width="100%" height="85px" cellpadding="5" cellspacing="0">
               <tr>
               <td  class="subMenu" align="right" valign="bottom">
                           <a href="#" class="linkSubMenu" >
                          <ice:outputText value="Home" />
                          </a> &nbsp; | &nbsp;
                          <a href="#" class="linkSubMenu" >
                              <ice:outputText value="Register" styleClass="linkSubMenu" />
                          </a> &nbsp; | &nbsp;
                          <a href="#" class="linkSubMenu" >
                              <ice:outputText value="Login" styleClass="linkSubMenu" />
                          </a>                     
                </td>
                </tr>
              </table>
      </div>
    </div>
</div>

6. Create footer.jspx file with the following code which creates page footer with copyright information

<div xmlns="http://www.w3.org/1999/xhtml"
     xmlns:ice="http://www.icesoft.com/icefaces/component">
<div class="footer_container">
    <div class="footer_content">
        <div style="width:400px">
            <a href="http://icefaces-tutorial.blogspot.com/" target="_blank">
            Copyright&#169; 1998-2008 ICEfaces Tutorial .
            </a>
        </div>
        <div style="float:right;width:250px;"><i>Powered By 
            <a href="http://icefaces-tutorial.blogspot.com/" target="_blank">ICEfaces Tutorial</a></i>
        </div>
    </div>
</div>
</div>

7. Modify the index.jspx file with the following code which apply the default template and define the page contents

<ui:composition
        template="/includes/templates/default-template.jspx"
        xmlns:h="http://java.sun.com/jsf/html"
        xmlns:f="http://java.sun.com/jsf/core"
        xmlns:c="http://java.sun.com/jstl/core"
        xmlns:ice="http://www.icesoft.com/icefaces/component"
        xmlns:ui="http://java.sun.com/jsf/facelets" >

  <!-- params for page titles-->
        <ui:param name="pageTitle" value="ICEfaces Tutorial Home" />
  <!-- page content start  -->
    <ui:define name="page-content">
          <ice:outputText value="Welcome to ICEfaces Tutorial." />
    </ui:define>
  <!-- page content end -->
</ui:composition>

 
8. Add the following styles to showcase_style.css for additional link style for your menu.
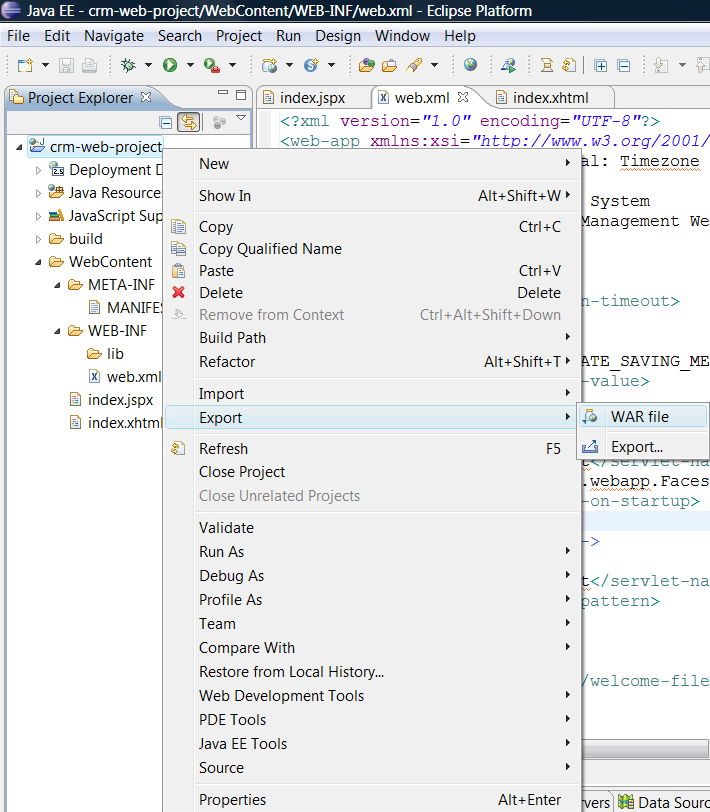
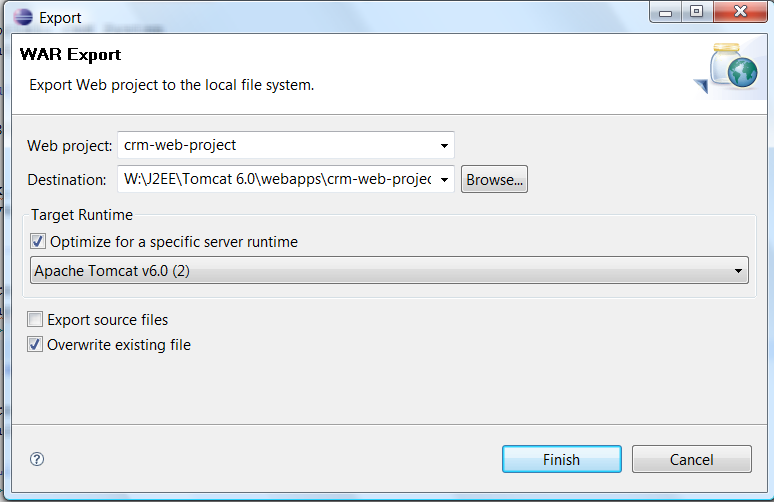
/* Sub Menu Class */
.subMenu { color:#293D6B;
    FONT-FAMILY: Verdana, Arial;
    FONT-SIZE: 11px;
    FONT-WEIGHT:bold;
      text-decoration:none;
    text-align:right;
    vertical-align:middle;
    }
a.linkSubMenu:link    {
    color:#293D6B;
    FONT-FAMILY: Verdana, Arial;
    FONT-SIZE: 11px;
    FONT-WEIGHT:bold;
    text-decoration:underline; }
a.linkSubMenu:visited { color:#293D6B;
    FONT-FAMILY: Verdana, Arial;
    FONT-SIZE: 11px;
    FONT-WEIGHT: bold;
    text-decoration:underline; }
a.linkSubMenu:active  { color:#293D6B;
    FONT-FAMILY: Verdana, Arial;
    FONT-SIZE: 11px;
    FONT-WEIGHT: bold;
    text-decoration:underline; }
a.linkSubMenu:hover   { color:#293D6B;
    FONT-FAMILY: Verdana, Arial;
    FONT-SIZE: 11px;
    FONT-WEIGHT: bold;
    text-decoration:underline; }

9. Save all the files, then Export as WAR file and deploy to your tomcat as explained in previou post, "Configuring and Deploying Web Application".

Ok.. now, open your web site from browser and you will see the nice welcome page with cool styles.!!!

Saturday, February 7, 2009

Configuring and Deploying Web Application

After creating index.jspx, we've to create welcome page, so called index.xhtml, and add this welcome page to web configuration and redirect to index.jspx using ICEface Servlet.

1. Create index.xhtml file in the same folder where you created index.jspx
2. Enter the following code to index.xhtml

<!DOCTYPE html PUBLIC "-//W3C//DTD XHTML 1.0 Transitional//EN" "http://www.w3.org/TR/xhtml1/DTD/xhtml1-transitional.dtd">
<html xmlns="http://www.w3.org/1999/xhtml">

<head>
<meta http-equiv="Refresh" content="0; URL=index.iface" />
</head>

</html>


2. overwrite web.xml file, which is under WEB-INF folder, with the following code:

<?xml version="1.0" encoding="UTF-8"?>
<web-app xmlns:xsi="http://www.w3.org/2001/XMLSchema-instance" xmlns="http://java.sun.com/xml/ns/javaee" xmlns:web="http://java.sun.com/xml/ns/javaee/web-app_2_5.xsd" xsi:schemaLocation="http://java.sun.com/xml/ns/javaee http://java.sun.com/xml/ns/javaee/web-app_2_5.xsd" id="WebApp_ID" version="2.5">
<display-name>ICEfaces Tutorial: Timezone Part 1</display-name>
<description>
ICEfaces Tutorial: CRM System
Customer Relationship Management Web Application
</description>
<!-- Session timeout -->
<session-config>
<session-timeout>30</session-timeout>
</session-config>

<context-param>
<param-name>javax.faces.STATE_SAVING_METHOD</param-name>
<param-value>server</param-value>
</context-param>

<context-param>
<param-name>javax.faces.DEFAULT_SUFFIX</param-name>
<param-value>.jspx</param-value>
</context-param>

<context-param>
<param-name>facelets.DEVELOPMENT</param-name>
<param-value>true</param-value>
</context-param>

<!-- Faces Servlet -->
<servlet>
<servlet-name>Faces Servlet</servlet-name>
<servlet-class>javax.faces.webapp.FacesServlet</servlet-class>
<load-on-startup>1</load-on-startup>
</servlet>

<!-- Persistent Faces Servlet -->
<servlet>
<servlet-name>Persistent Faces Servlet</servlet-name>
<servlet-class>com.icesoft.faces.webapp.xmlhttp.PersistentFacesServlet</servlet-class>
<load-on-startup>1</load-on-startup>
</servlet>

<!-- Blocking Servlet -->
<servlet>
<servlet-name>Blocking Servlet</servlet-name>
<servlet-class>com.icesoft.faces.webapp.xmlhttp.BlockingServlet</servlet-class>
<load-on-startup>1</load-on-startup>
</servlet>

<!-- Persistent Faces Servlet Mappings -->
<servlet-mapping>
<servlet-name>Persistent Faces Servlet</servlet-name>
<url-pattern>/xmlhttp/*</url-pattern>
</servlet-mapping>

<servlet-mapping>
<servlet-name>Persistent Faces Servlet</servlet-name>
<url-pattern>*.iface</url-pattern>
</servlet-mapping>

<!-- Blocking Servlet Mapping -->
<servlet-mapping>
<servlet-name>Blocking Servlet</servlet-name>
<url-pattern>/block/*</url-pattern>
</servlet-mapping>
<!-- Welcome File List -->
<welcome-file-list>
<welcome-file>index.xhtml</welcome-file>
</welcome-file-list>
</web-app>


3. Copy the following libs, jar files, from [ICEface installed]\lib to [crm-web-project]\WebContent\WEB-INF\lib

  • backport-util-concurrent.jar
  • commons-beanutils.jar
  • commons-collections.jar
  • commons-digester.jar
  • commons-discovery.jar
  • commons-el.jar
  • commons-fileupload.jar
  • commons-logging.jar
  • el-ri.jar
  • icefaces-comps.jar
  • icefaces-facelets.jar
  • icefaces.jar
  • jsf-api-1.2.jar
  • jsf-impl-1.2.jar
  • jstl.jar
  • krysalis-jCharts-1.0.0-alpha-1.jar
4. Right-click on the crm-web-project, select Export-> WAR file from pop-up menu as shown in figure:


5. Select your [Tomcat installed directory]\webapps folder as Destination as shown in figure:
6. Select Overwrite existing file to overwite next time when you export war file again


7. Click Finish to complate war file generation
8. Start Tomcat 6.0, (Restart if already sarted)
9. Then connect your web application using browser and url:http://localhost:8080/crm-web-project/index.iface
10. Congradulation! You've successfully created ICEface application. You'll see the first line of "
Tank you for using ICEfaces." in your browser.

In next post, we'll start working on the style and ICEface UI Components.

Creating New JSPX Using ICEface Template

We've got new Dynamic Web Project from previous post. Now, we gotta start creating new jspx page.

1. Right click on the project in Eclipse Project Explorer
2. Select New -> JSP from pop-up menu as shown in figure below:


3. Enter index.jspx in File name as show in figure below:
4. Click Next to continue


5. Select New ICEfaces JSPX File from JSP Template list
6. Click Finish to create jspx file with predefined tags from template


Creating New ICEface Project

First of all, open Eclipse IDE, i) Opening Eclipse, then create new dynamic web project ii) Creating Dynamic Web Project. Finally, we'll test first page of our web application iii) Building Web Project and deploy to Tomcat following iv) Deploying to Tomcat

i) Opening Eclipse
You can open using eclipse.exe file, or follow the steps below if you have more memory (RAM) for the better performance:

  1. create new file called runeclipseee.bat file in the folder where eclipse.exe exist.
  2. edit the file adding this text "eclipse.exe -vmargs -Xmx1024M -XX:MaxPermSize=256M ", it will use maximum of 1GB memory instead of default 512MB and 256 Perm Size.
ii) Creating Dynamic Web Project
After opening Eclipse IDE, we will create dynamic web project by configuring the default server and so on.

1. Go to File Menu -> New -> Dynamic Web Project, as shown in figure below.


2. The New Dynamic Web Project wizard will appear, enter "crm-web-project" in project name.

3. Select the project directory or use default

4. Click New button in Target Runtime to create new Runtime environment.

5. Select Apache Tomcat v6.0 from the list as shown in figure below and click Next to continue.


6. Select Tomcat installation directory that you installed tomcat earlier and also select JRE 1.5 as shown in figure


7. Click Finish to complete Runtime Environment set up.

8. Finally, click Finish in New Dynamic Web Project wizard to complete creating new project.

[continue in next post]

Friday, February 6, 2009

Setting Up Working Environment

To start working on web application development, you need to download and install a set of tools and packages. You system must also be able to support a specific minimum requirements, see i) System Requirements.

If your system fulfill the minimum requirement, continue ii) Installing Prerequisite and Development Tools. Then, iii) Installing Web Server (Tomcat 6.0), and finally, prepare your tools with iv) Preparing Tools.

i) System Requirements

The followings are the minimum system requirements to develop web application:
  • Operation System: Any Java Enable Operation System
  • Memory: 512 MB
  • Processor: 1.8 GHz Pentium 4
  • Storage: 2 GB
This tutorial will use, however, Windows Vista Home Primium. You should choose the correct installer for the required tools and libraries depending on your operation system.

ii) Installing Prerequisite

Java is a main prerequisite for java based web application system, followed by ICEfaces library for API reference.

Java
You can use JDK 1.5 or later version, follow the steps to install JDK 1.5:
  1. Go to java.sun.com
  2. Accept License Agreement and select the jdk-1_5_0_17-windows-i586-p.exe to download
  3. After download, click the installer file to execut
  4. Continue the installation process following the wizard, it will take a few minutes to install JDK
ICEfaces
You have to download both ICEfaces libraries and Eclipse Plugin
  1. Go to icefaces.org
  2. Register user name and password for ICEFaces community
  3. Then download both ICEfaces-1.7.2-SP1-bin.zip and ICEfaces-1.7.2-SP1-Eclipse-3.4-plugins.zip
  4. Extract ICEfaces-1.7.2-SP1-bin.zip to the folder that you want to install, for instance: d:\icefaces. Keep the other file, eclipse plugins, to extract after eclipse is downloaded.
iii) Installing Web Server (Tomcat 6.0)
You can download Tomcat 6.0 or later version for web application server. The others web application server such as JBoss, GlassFish will also work the same.
  1. You have to download both ICEfaces libraries and Eclipse Plugin
  2. Go to tomcat.apache.org
  3. Select Windows Service Installer from Binary Distributions list
  4. Download and save apache-tomcat-6.0.18.exe
  5. Double click the file to install after download is completed
  6. Continue the installation process following the wizard
iv) Preparing Tools
You might a several tools in order to design and implement the web application. The following tools are optional and do not required to installed all of them. However, you should use eclipse since this tutorial will use Eclipse for the demonstration.

7-zip
It's the free zip tools that allow you to view, extract or create zip files. You will need it to view war files or extracting downloaded files. Here is the download link.

Firefox Web Developer Plugin
It's very useful to validate css, form fields and trace of javascripts output. You can download it from here.

PSPad
This is the powerful text editor supporting many popular programming languages and text file formats such as xml, xhtml, javascript and so on. Download it from here.

Eclipse
Finally, you can get Eclipse IDE for J2EE which comes along with web development plugin.
  1. Go to eclipse.org.
  2. Select the mirror and download eclipse-jee-europa-winter-win32.zip
  3. Extract the file to the folder that you want to install.
  4. Then you have to extract ICEfaces eclipse plugin, ICEfaces-1.7.2-SP1-Eclipse-3.4-plugins.zip, that is already downloaded to the same folder as eclipse-je.
OK! Now.. Set up is complated and we are ready to start!

Understanding JSF and ICEfaces

First of all, I'd like to explain a little bit about JSF and ICEfaces.

What is JSF?
JSF is the JavaServer Faces Technology, a server-side user interface component framework, which allow to build web application easily and quickly using its read-made UI components, and connect the front-end application with the back-end enterprise server application, web service or database. JSP itself contains a set of API to manage UI components, events handling, page navigation and form validation. In addition, JSP custom tag library also come along with JSF for using JSF technology in JSP pages. [ Ref: java.sun.com]

What about ICEfaces?
Yes, ICEfaces is one of the JSF implementation powered by ICESoft Technologies, Inc. Among the other JSF implementations, MyFaces and RichFaces, ICEfaces is easier to use, and it offer rich documentations as well. On top of that, ICEfaces component-sute is very powerful and coverd most of the UI requirements. ICEfaces component-suite contains varity of reusable web UI components, for example: autocomplete form, charts, calendar, file uploads, menu bar, tree, table, or even drag-and-drop components. [Ref: icefaces.org]

Introduction to ICEfaces Tutorial Blog

Dear Reader,

If you are a web developer, or a business owner who want to use web application for your business, or a researcher, or a student who learning java and script programming, this blog is for you. You will see the step-by-step guide on how to build the complete web application using ICEfaces and Java technology. Each blog post will demonstrate the detail implementation of a single function.

In this blog, the simple web application, let's say: customer relationship management system (CRM), will be used as an example web application. CRM can be used for the purpose of:
supporting customer service for your products (for example: keep all customer transactions and support customize services for better customer satisfactions.)

The sample CRM application, which will be used to demonstrate the tutorial of using ICEfaces, will have the following features:

Registering a new customer with a product reference number: this feature will allow you to know the detail information of your customer and which product that the customer brought recently.

Add a product reference number to receive the discount code: this feature will generate the discount code for next purchase of the product because your customer is freuently buying your products. (this feature is especially to attract long-term customer)

Login to CRM and browse the upcoming product news: this feature will allow customer to know the information of new products which are not yet released.

Add wish list for the particular product: this feature allow you to know what the customer want before you really release a new product.


Limitations of this tutorial

Since, with the purpose of ICEfaces tutorial, only the front-end web implementation of CRM will be presented with dummy data. Server-side implementation and connection to database server will not be discussed.


Copyright Notice

The information contained in this blog has been prepared solely for the purpose of learning only. The copyright of the material contained in this blog belongs to and remains with the writer, icefaces-tutorial, unless otherwise stated. Your access to it does not imply a license to reproduce and/or distribute this information for commercial purpose. Please send email to awayyout@gmail.com for the legal use of this CRM application.